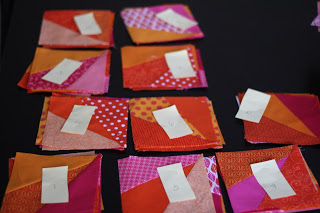
Last week, I asked you how you keep track of pieces when you sew. Thanks to everyone who shared a strategy!
I summarized the responses and added a couple more based on some additional research. Here they are:
1. Post-its
Post-its seem to be the most popular way to keep track. I was encouraged to see that I wasn’t the only one using them. Each Post-it is numbered and attached to the appropriate stack either with the adhesive on the back of the Post-it or with a pin. Or you could even do like Katy from The Littlest Thistle and use mini binder clips to attach the Post-its to the pieces.
The only problem I’ve had using Post-its is that it’s easy for them to come off if you don’t pin them on. And as Kelly from Jeliquilts mentioned, it’s really easy for these little pieces of paper to get out of order.
If you do use pins with the Post-its, pinning and unpinning can slow the piecing process down a bit. The other thing that really bugs me is the waste. I always plan to keep them for the next project, but eventually they find their way scattered on the floor of my sewing room and I throw them out and start using a whole new set of Post-its for the next quilt top.
2. Index cards
You can also use index cards to keep the pieces in order. Debbie from A Quilter’s Table cuts index cards into 2″ squares and numbers each. Then she punches a hold in the squares and uses a safety pin to attach the squares to the blocks.
3. Flat head pins
Lynn from Hey-Boo, numbers her flat head pins with a Sharpie and places a pin in each stack according to the number to keep them in order. And unlike Post-its, the pins are reusable.
4. Keep a visual of the layout
Megan from jaffa quilts takes a photo of the pieces laid out according to the design. She downloads the photo to her laptop and keeps it nearby as she sews to keep track of the layout. You could also take a photo with your phone and check it as you piece. Another option is to use a sketch of the layout as a visual reminder.
5. Number the blocks
Diane from Braiser House keeps the rows in order by writing numbers on the back of the first block of each row in pencil.
6. Painter’s tape
Painter’s tape is one of the common tools used by quilter’s today. Elizabeth from Oh, Fransson! has used it to keep rows of blocks organized. She describes the technique in detail here. Elizabeth also had a tutorial last April for making a cute set of row markers, but unfortunately, I can’t seem to bring up the link. If anyone has a link to it, please let me know in the comments!
7. Bread ties
Don’t throw away those little plastic thingamajigs that come with your bread! Karen from Sew Many Ways has a post on how you can use them to mark your rows. Check it out here.
I hope you find these strategies helpful! If you have other strategies that you use, please feel free to share in the comments section.
Happy sewing!


9 comments
Love seeing everyone's different strategies, so many options!
This is really helpful! I usually take photos of my layouts, but it's great to see some other options when my camera isn't handy.
This is very helpful – lots of good ideas! Thanks for pulling them together, Nicole!
This is a great post full of helpful ideas!
Thank you very much for putting these together..very useful information. 🙂
Ohh so many ideas to try 🙂
Great post and loads of fab ideas – love painter`s tape – so useful for so many things!
Thank you! These tips are great!
I usually end up with quilt all lais out on the floor then I choose a row and stack from left to right. When I have my stack I go to the machine and sew, adding to the right hand side all the time. I do this for each row then sew the rows together. Having said that, it works for straight forward blocks but is a little harder if the quilt is "on point" and there are triangles as well. I have to confess, I am not very organised! Enthusiastic! But not organised (sigh!)
Comments are closed.